So you've got big goals.
Maybe you want to race, go faster on the bike leg of a triathlon, shave some time off your previous KOM, or simply become a stronger, faster cyclist.
And maybe you've read my previous blog on why you should get a power meter instead of carbon wheels if performance is what you're after...
And you finally did.
So now you have a power meter. Or you have a heart rate monitor (HRM).
But how do you actually use them? What are you even supposed to do with them? What do the numbers mean?
In this, and potentially the next few blogs, I'll try to answer these exact questions. I'll cover the training fundamentals and approach for both riders using a power meter and those training with heart rate.
1) Understanding Training Zones
Baseline assessment is the first and foremost step in starting any meaningful training.
If you don't know where you stand, how do you assess whether you've improved?
We usually establish a baseline using a few power tests: 5 seconds, 1 minute, 5 minutes, and 20 minutes, along with a 20-minute LTHR test. More on this later.
More importantly, baseline assessment helps us dial in your power and heart rate zones, which are the pillars of any structured training plan.
"What are zones?" you may ask.
Well, technically, zones are somewhat arbitrary distinctions that sports scientists and coaches have made for our convenience.
When you ride easy versus when you ride hard, your body behaves very differently.
Your metabolic reliance (whether your body primarily uses fats or carbohydrates for energy), the amount of lactate produced, oxygen availability for energy production, Time to Exhaustion (TTE), and many other physiological factors differ widely based on how easy or hard you're riding.

These bodily responses are usually grouped into training zones.
So, in short, zones tell you how hard your body is working by putting a number to your effort. Zone 1 is very easy, Zone 2 is a little harder, Zone 3 is harder, and so on.
Most models use 5 zones, although some use 3, while others use as many as 7.
You can learn more about these zones here.
2) Baseline Power & HR Testing
Now that you have a decent idea of what zones are, the next question is: how do you set them?
The answer is simple: all-out efforts over specific durations, usually 5 seconds, 1 minute, 5 minutes, and 20 minutes.
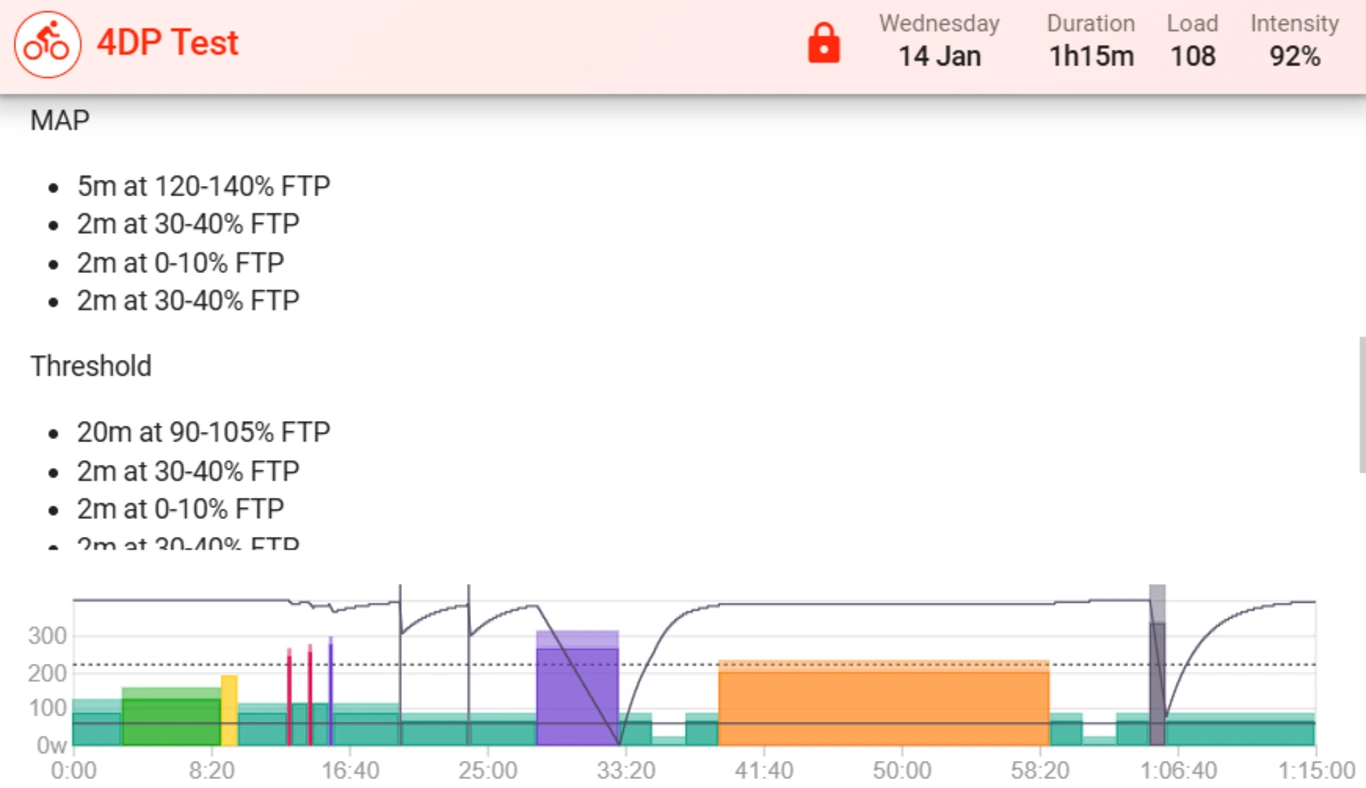
There are many other testing methods, such as Critical Power testing and AWC, but these four assessments are the most useful for most riders.
For riders using only heart rate, only the 20-minute (or ideally 40-60 minute) all-out effort is required, along with your maximum heart rate achieved during cycling. Average heart rate values over 1 or 5 minutes aren't meaningful enough to base training zones on.
Those using a power meter should perform these tests on separate days, with ample recovery in between.
The 5-Second Test
Pretty simple and easy to execute.
Find a safe, traffic-free stretch of road, drop a few gears, and sprint as if you're racing. You may need a couple of attempts to get the gearing and timing right, but that's perfectly normal.
The 1-Minute Test
Arguably the simplest power test to execute.
Find a slight incline or climb if possible (though it's not mandatory), and simply go as hard as you possibly can for one minute.
Stomp on the pedals. Give it everything you've got.
Whether you're seated or standing doesn't really matter, although standing will generally produce a slightly higher value, which is what we're after.
The 5-Minute Test
In my opinion, and according to many of my athletes, this is the most painful one.
This is also where pacing starts becoming much more important than in the 1-minute test.
The objective, however, remains simple: go as hard as you can while keeping in mind that you have to sustain that effort for the full five minutes.
The 20-Minute Test
It's generally better to schedule your 20-minute test after you've completed your 5-minute test, especially if it's your first time, as it provides a useful reference point.
For this effort, I'd recommend trying a negative split, meaning you gradually increase your power throughout the effort. This generally helps you achieve the highest average power while ensuring you finish with nothing left in the tank.
A good starting point is around 75-80% of your 5-minute power, increasing by roughly 5-10 watts every 4-5 minutes.
For example, if your 5-minute power is 300 W, I'd begin around 225-240 W for the first few minutes and then gradually increase the power every five minutes, depending on how I'm feeling.
The final five minutes can, and should, be full gas.
It is worth noting, especially for the 5-minute and 20-minute tests, that it's perfectly fine if your first attempt isn't textbook perfect.
Chances are, even your twentieth attempt won't be.
If you fall short by a few watts, that's completely okay. Learn from the pacing and improve next time. There's no need to immediately retest unless you've catastrophically mis-paced the effort and blown up completely.
3) Setting Up Your Zones
So you've completed your tests.
For the sake of simplicity, I'll use some example values.
Let's say your:
5-second power = 1000 W
1-minute power = 500 W
5-minute power = 300 W
20-minute power = 250 W
Average HR during the 20-minute test = 185 bpm
Maximum HR = 200 bpm
From these values, we first estimate:
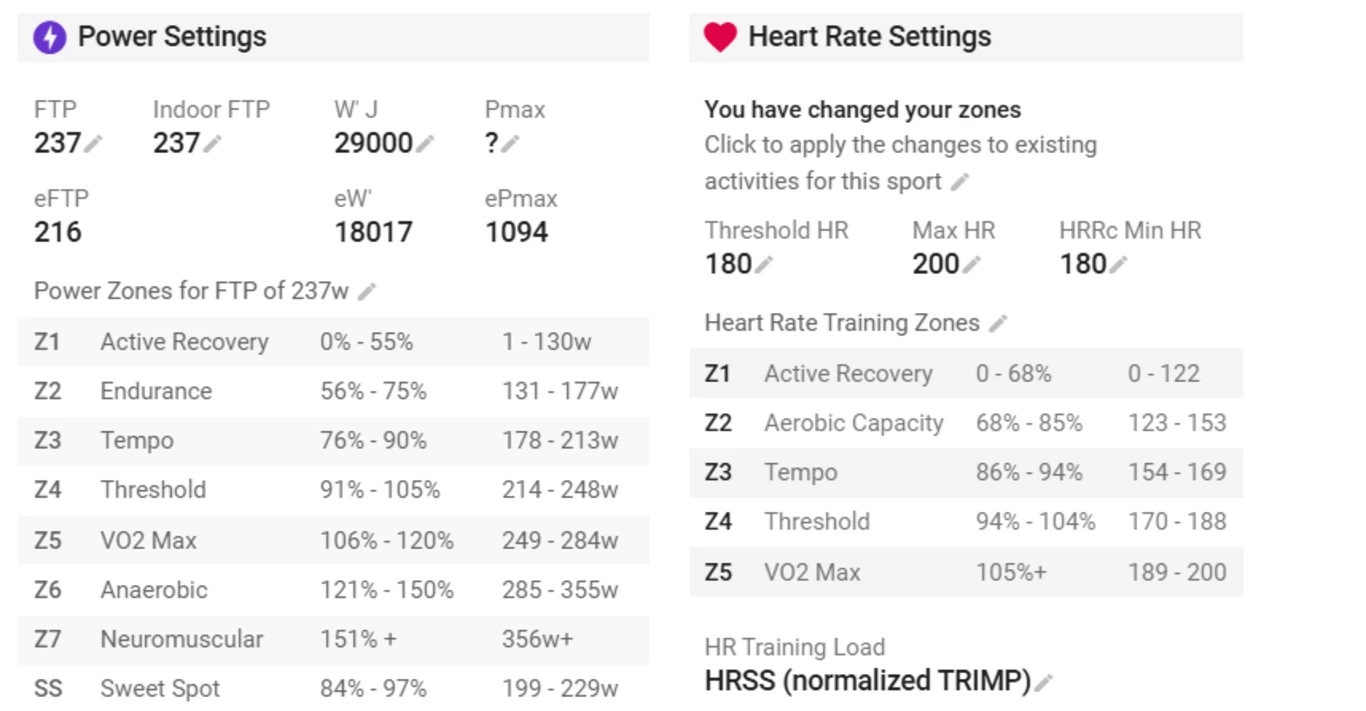
FTP (Functional Threshold Power): The highest average power you can sustain for roughly 40-60 minutes.
LTHR (Lactate Threshold Heart Rate): The highest average heart rate you can sustain for roughly 40-60 minutes.
For FTP, the general rule of thumb is 95% of your 20-minute power.
So in our example:
95% × 250 W = 237 W
This is, in theory, the highest average power you can sustain for around 40-60 minutes.
However, it's worth noting that this estimate can sometimes be misleading, especially for riders with a high anaerobic contribution or low fractional utilisation.
In simple terms, if your 1-minute or 5-minute power is unusually high relative to your 20-minute power, your true FTP may be closer to 90-95% of your 20-minute power instead of the standard 95%.
Critical Power testing accounts for this more accurately, but for the sake of simplicity:
If your 20-minute power is around 85% of your 5-minute power, using 95% is a good estimate.
If your 20-minute power is only around 75-80% of your 5-minute power, using roughly 92-93% may give a more realistic FTP estimate.
For LTHR, a good estimate is 97-98% of your average heart rate during the 20-minute test.
In our example:
97.5% × 185 bpm ≈ 180 bpm
Once you know your FTP and LTHR, you can finally estimate your training zones.
And I say "estimate" for good reason.
The percentages I'm about to share are not the holy grail or some magical formula. They're estimates derived from averages across numerous studies and years of coaching practice.
They won't work perfectly for everyone, but they'll work well for the vast majority of riders.
If you wanted to argue that your Zone 2 ends at 83% instead of 87% of LTHR, I couldn't confidently agree or disagree without proper in-lab lactate testing.
That said, these values provide an excellent starting point and will absolutely help you train better.
Power
Zone 1: 0-55% FTP
Zone 2: 56-75% FTP
Zone 3: 76-90% FTP
Zone 4: 91-105% FTP
Zone 5: 106-120%+ FTP
Heart Rate
Zone 1: 0-68% LTHR
Zone 2: 69-85% LTHR
Zone 3: 86-94% LTHR
Zone 4: 94-104% LTHR
Zone 5: 105%+ LTHR
If you'd rather skip the math, head over to the Power Calculator here.
Conclusion
Once you've done that, congratulations!
You now have a much better understanding of your training intensities and are one step closer to becoming a stronger, faster rider.
But if you noticed, I never actually used the values from the 5-second, 1-minute, or 5-minute power tests.
So what do they mean? What do they actually tell us?
That's a really interesting topic, and it's something I'll cover in the next blog.
I'll also explain how to actually use these zones to plan your training and structure your intervals.
In the meantime, if you're curious, you can read more about training zones, different testing models and their limitations in my previous compilations here.